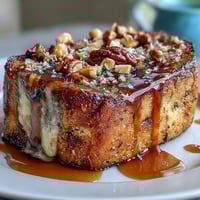
 Pin It
 I'll never forget the first time I created a dessert platter that actually made people gasp when they walked into the room. It was at a dinner party where I wanted to move beyond the typical cake-and-ice-cream routine, and I realized that sometimes the most impressive desserts aren't complicated—they're just thoughtfully arranged moments of indulgence. That day, I learned that a beautiful dessert board is less about cooking skills and more about creating a visual feast that draws people together.
I still remember my sister's face when she saw her birthday dessert board—not because the food was complicated, but because someone had taken the time to make it beautiful just for her. That's when I realized this isn't really a recipe; it's a love language spoken through chocolate, fruit, and symmetry.
Ingredients
- Strawberries (1 cup, halved): The perfect anchor for any dessert board—they're naturally pretty and their tartness balances the sweetness around them
- Blueberries (1 cup): These little gems fill gaps beautifully and add gorgeous color contrast without any prep work
- Raspberries (1 cup): Delicate and elegant, they deserve a gentle touch and a prominent spot on the board
- Kiwis (2, peeled and sliced): The bright green color is non-negotiable for visual impact, and they add a lovely tartness
- Mango (1, peeled and cubed): The tropical sweetness here pairs unexpectedly well with dark chocolate drizzles
- Assorted truffles (1 cup): Buy these if you can—they're the jewelry of the dessert world and instantly elevate everything around them
- Chocolate-covered almonds (1 cup): These add crunch and keep guests from reaching for the same chocolate pieces repeatedly
- Mini brownies or brownie bites (1 cup): Homemade or store-bought, these ground the board with something warm and familiar
- Assorted macarons (1 cup): If you can find them, they're worth every penny for the color and sophistication they bring
- Shortbread or butter cookies (1 cup): Simple cookies let the other elements shine—don't overthink this one
- Dark chocolate chips (1 cup): These melt beautifully and taste richer than white chocolate alone
- White chocolate chips (1/2 cup): The contrast between dark and white chocolate drizzles is what makes this board feel intentional
- Chopped pistachios (2 tablespoons): The subtle color and slight earthiness are the finishing touch—don't skip this if you can
- Dried rose petals (2 tablespoons, optional): If you use these, they should feel like a secret ingredient, not overdone
- Fresh mint leaves: A last-minute greenery addition that says you care about the details
Tired of Takeout? 🥡
Get 10 meals you can make faster than delivery arrives. Seriously.
One email. No spam. Unsubscribe anytime.
Instructions
- Gather and plan your canvas:
- Start by laying out your large serving board or platter. Before you touch anything, arrange all your ingredients nearby so you can see what you're working with. This is your moment to become a visual artist—take a breath and imagine the final board in your mind. Think about balance, color, and negative space. The most beautiful boards feel intentional, not cluttered.
- Prepare your fruits with care:
- Wash and thoroughly dry each fruit—moisture is the enemy of a beautiful board. Slice your strawberries and kiwis into even pieces that look like they were meant to be there. Cube your mango with intention. Leave your berries whole and gleaming. As you prepare each fruit, think about how its color will sing against the others.
- Awaken the chocolate:
- In two separate microwave-safe bowls, begin melting your dark and white chocolate chips. Use 30-second intervals, stirring gently between each burst. Chocolate wants to be treated with respect—overheat it and it becomes grainy and temperamental. When it reaches that glossy, pourable consistency, it's ready. This is the moment when your platter transforms from good to unforgettable.
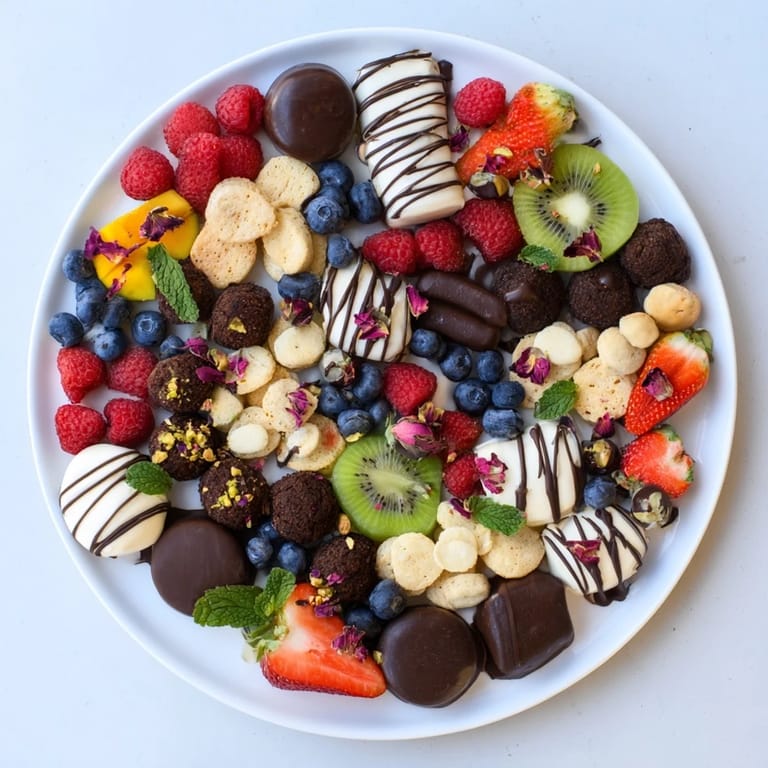
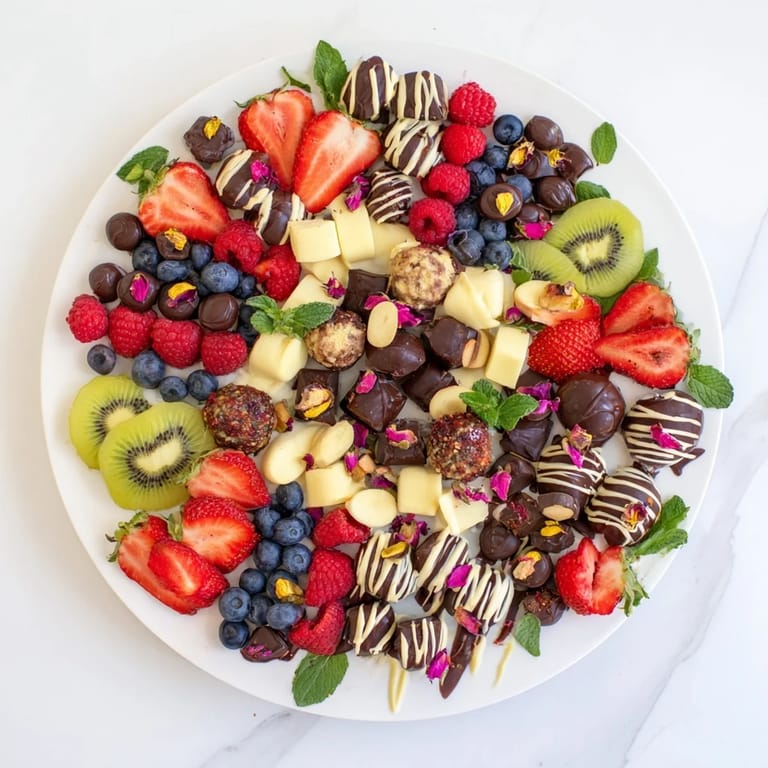
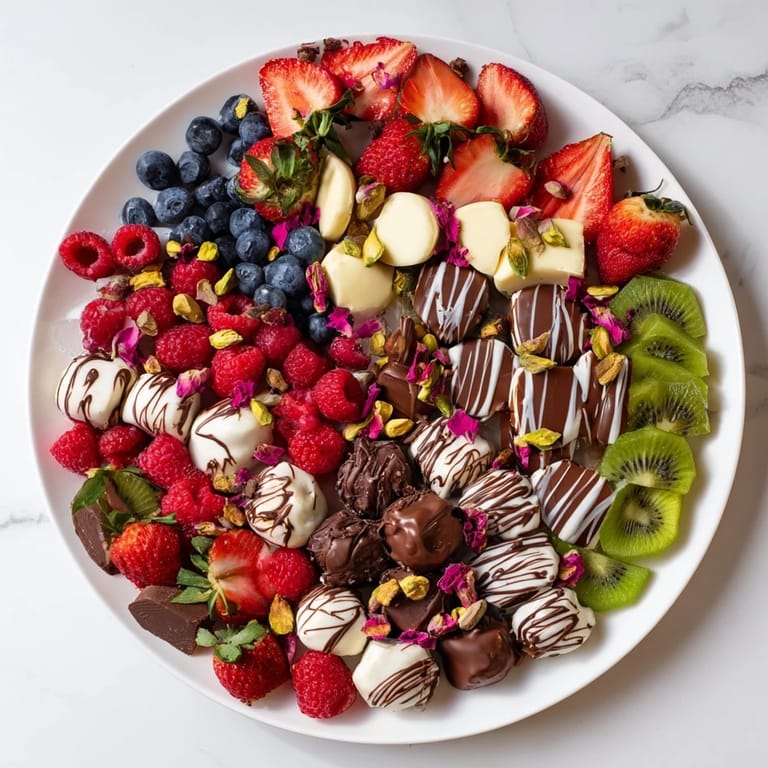
- Build with symmetry in mind:
- Begin placing your fruits in mirrored arrangements on opposite sides of your board. Imagine an invisible line down the center. Arrange your strawberries, kiwis, and mango so they echo each other. Then place your truffles, macarons, and brownies in alternating rows or circles. Step back frequently and see your board as your guests will see it. Does it feel balanced? Does something need to move?
- Fill the spaces thoughtfully:
- Now comes the satisfying part—tucking cookies, chocolate-covered almonds, and remaining sweets into the gaps. This is where you make sure no spot feels empty or forgotten. Look for color combinations that make sense: a golden shortbread next to deep chocolate, bright raspberry next to pale macaron. Trust your eye.
- Create chocolate magic:
- Using a spoon or piping bag, begin drizzling your melted chocolate over the board in loose, confident lines. Some people prefer thin, delicate drizzles; others like bold swirls. Neither is wrong. The chocolate should look like it happened naturally, like liquid gold decorating a masterpiece. Let some drizzles pool slightly, creating visual interest.
- Add the finishing layers:
- Sprinkle your chopped pistachios and dried rose petals across the board in places where they'll catch the light and draw the eye. These aren't afterthoughts—they're the final brushstrokes that say this was made with intention.
- Crown with greenery and serve:
- Tuck fresh mint leaves into spaces you've left for them. Step back and admire your work. Serve immediately while the chocolate is still glossy, or refrigerate until guests arrive. Either way, watch their faces when they see what you've created.
 Pin It
 There's a moment right before guests arrive when you step back and see what you've created—the colors, the arrangement, the care in every placement. That's when a dessert board becomes more than just food. It becomes a conversation starter, a focal point, an edible centerpiece that says you thought about bringing joy to their evening.
Building Your Personal Style
The beauty of a dessert board is that it's entirely yours to customize. I've learned that the best ones reflect not just current trends but the season, the occasion, and who you're serving. In summer, I lean heavily on fresh berries and lighter sweets. In winter, I add more chocolate, nuts, and spiced elements. Once you understand the basic principle—balance colors, textures, and flavors—you can make this board a true reflection of your taste and the people you're feeding.
The Wine Pairing Secret
I discovered by accident that the right beverage transforms a dessert board from beautiful to memorable. A sparkling wine lifts the chocolate and fruit in surprising ways, while a dessert wine deepens the richness. If you're serving this at a dinner party, don't forget this final detail—it's the difference between guests saying 'this was nice' and 'I'm still thinking about that board.'
Adapting for Every Occasion
This board adapts beautifully to dietary needs and preferences without losing its impact. For gluten-free guests, swap in quality gluten-free cookies and brownies—no one will know the difference. If nuts are a concern, replace the pistachios and chocolate-covered almonds with toasted seeds or extra dried fruit. If you have guests avoiding dairy, use dark chocolate with higher cacao percentages and dairy-free sweets. The structure stays strong; only the details change.
- Always check product labels before serving if guests have allergies—cross-contamination happens more often than we realize
- Prep all fruits the morning of your event and store them in airtight containers; they'll stay fresher and you'll stress less
- If you're serving this for a special occasion, add a small handwritten tag with the ingredients—it's elegant and helpful
 Pin It
 Creating a dessert board is less about following rules and more about enjoying the process of making something beautiful. Your guests will taste the care in every thoughtful arrangement and chocolate drizzle.
Recipe Questions & Answers
- → How do I achieve a symmetrical arrangement?
Begin by placing fruits and sweets in mirrored positions across the board, arranging them in layers or circles to balance colors and shapes.
- → What is the best way to melt the chocolates?
Melt dark and white chocolate chips in separate microwave-safe bowls in 30-second intervals, stirring until smooth.
- → Can I customize the fruit selection?
Yes, fruits like grapes or apple slices can be added to vary the platter while maintaining visual appeal.
- → Are there options for nut allergies?
Yes, omit pistachios or substitute with nut-free garnishes to accommodate allergies.
- → How long can the platter be prepared in advance?
The platter can be assembled shortly before serving or refrigerated to maintain freshness and appearance.