 Pin It
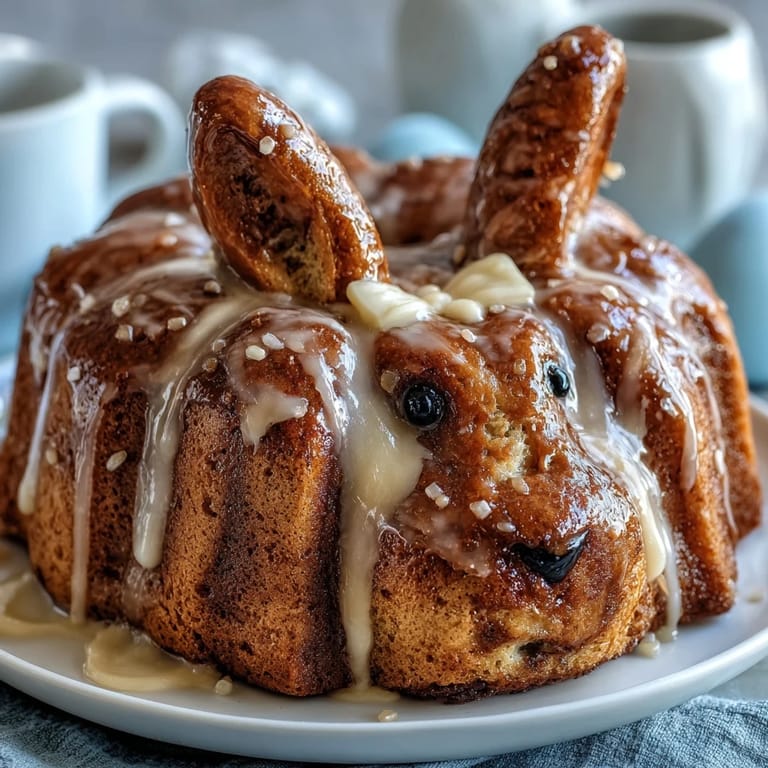
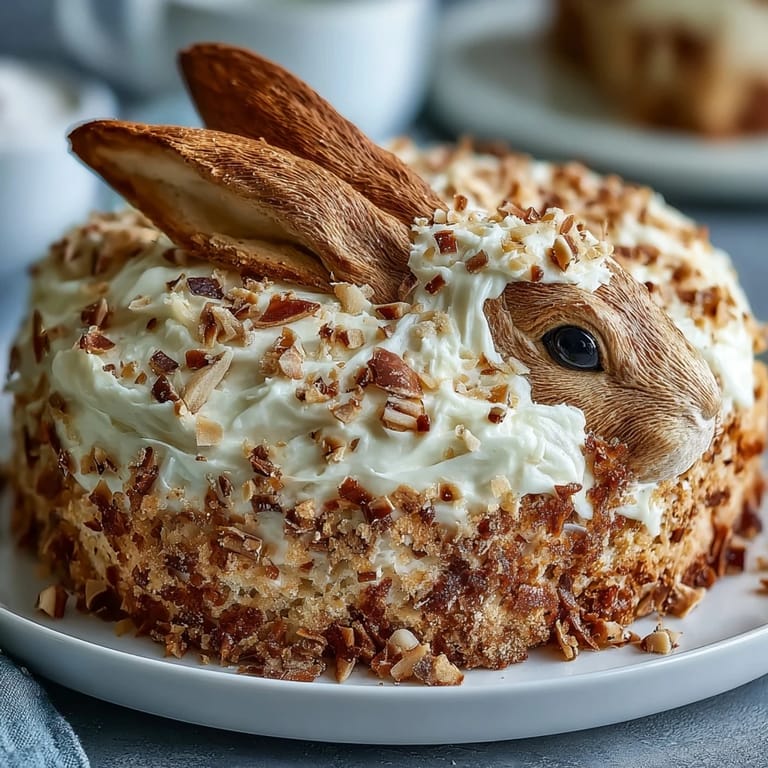
 My daughter's face lit up the moment she saw the bunny cake sitting on our kitchen counter—gold sprinkles catching the afternoon light like tiny edible stars. I'd spent the morning mixing and baking, but honestly, the real magic happened when she helped me press coconut onto the frosting and arrange those marshmallow cheeks. It wasn't about perfection; it was about creating something whimsical together that made Easter feel genuinely special.
Last Easter, my sister brought her twins over and we did a whole cake-decorating station in the kitchen—they were giggling so hard while trying to get the whiskers straight that I nearly dropped the licorice. Watching their absolute wonder when we set it on the table, lit by the afternoon sun with those gold sprinkles gleaming, reminded me that desserts are really just an excuse to gather people around something joyful.
Ingredients
- All-purpose flour (2 ½ cups): The foundation that keeps the cake tender—make sure it's measured by spooning and leveling, not scooping, or you'll end up with a denser crumb than intended.
- Baking powder (2 ½ tsp): This is what gives the cake its light, fluffy rise; don't skip the sifting step with the flour or you risk uneven leavening.
- Unsalted butter (1 cup for cake, 1 cup for frosting): Room temperature is non-negotiable here—cold butter won't cream properly and you'll get a gritty texture instead of that silky foundation.
- Granulated sugar (2 cups): Creamed with the butter until it looks like wet sand, this is where the cake gets its tender crumb and subtle sweetness.
- Large eggs (4): Room temperature so they incorporate smoothly without creating lumps or deflating the batter.
- Pure vanilla extract (1 tbsp plus 1 tbsp for frosting): The real stuff makes a noticeable difference in depth—imitation will taste thin by comparison.
- Whole milk (1 cup): Alternating with flour keeps the batter from overworking and helps achieve that tender crumb.
- Powdered sugar (4 cups): Sift it before using or you'll be fighting lumps throughout mixing; this step takes two minutes and saves your sanity.
- Shredded coconut (1 cup sweetened): Press it on gently so it adheres to the buttercream without crushing the soft frosting underneath.
- Pink gel food coloring: Gel is sturdier than liquid and won't thin out your buttercream if you're tinting coconut for the ears.
- Marshmallows (2 large, 2 mini): The large ones become cheeks and add that playful character; mini ones work perfectly as teeth.
- Black licorice laces or black gel icing: Either works for whiskers and eyes—licorice is easier to position, gel gives you more control.
- Gold sprinkles: The final touch that catches light and makes everything feel celebratory.
Tired of Takeout? 🥡
Get 10 meals you can make faster than delivery arrives. Seriously.
One email. No spam. Unsubscribe anytime.
Instructions
- Prepare your pans and preheat:
- Set your oven to 350°F and take a moment to grease and flour those two 9-inch pans thoroughly—I like to use the heel of my hand to really work the flour into every corner so nothing sticks. Getting this step right means your cake will release cleanly without tearing.
- Combine the dry ingredients:
- Whisk together flour, baking powder, and salt in a medium bowl until everything is evenly distributed. This prevents pockets of baking powder that could create metallic spots in your finished cake.
- Cream butter and sugar:
- Beat them together for about 3 to 4 minutes until the mixture looks pale and fluffy, like fluffy clouds—this aerates the batter and sets up the tender structure you're after. You'll notice it transforms from a dense paste to something almost airy.
- Add eggs one at a time:
- Drop each egg in and beat it fully into the mixture before adding the next one; this ensures even incorporation and prevents that separated, curdled look. If you rush this step, your cake will be tougher.
- Mix in vanilla and create the batter:
- Stir in the vanilla, then alternate adding the flour mixture and milk, starting and ending with flour—this prevents overmixing the gluten, which would make your cake tough. You'll feel the batter go from thick to silky.
- Bake with patience:
- Divide the batter evenly between pans and bake for 30 to 35 minutes until a toothpick inserted in the center comes out clean. The kitchen will smell absolutely incredible during these last 10 minutes.
- Cool properly:
- Let cakes rest in the pans for 10 minutes so they set enough to release without breaking, then turn them out onto wire racks and cool completely. This prevents the frosting from melting into a warm cake.
- Make the buttercream:
- Beat softened butter until it's creamy and pale, then gradually add sifted powdered sugar, milk, vanilla, and a pinch of salt, beating until fluffy and smooth. The gradual addition prevents lumps from forming.
- Build the bunny shape:
- Use one cake round as the face and cut two ovals from the second round for ears; the leftover piece becomes the bowtie. Arrange everything on a large platter so it actually reads as a bunny.
- Apply the crumb coat:
- Frost the entire cake with a thin layer of buttercream and chill for 20 minutes—this seals in crumbs so your final frosting looks clean and professional. It's an extra step that genuinely matters.
- Final frosting layer:
- Apply a thick, even layer of buttercream now that the crumb coat has set. Take your time here because this is what people see.
- Add coconut fur:
- Press shredded coconut onto all the frosted areas while the buttercream is still soft enough to grab it. Work gently so you don't deflate your frosting.
- Tint and arrange pink details:
- Mix a small amount of coconut with pink food coloring for the inner ears and nose, pressing these into place for that bunny character. The pink pops beautifully against the white.
- Create the face:
- Place large marshmallows for cheeks, mini marshmallows for teeth, and arrange licorice laces or gel for whiskers and eyes. Step back and look at it—this is where the magic happens.
- Finish with sparkle:
- Scatter gold sprinkles over the whole bunny just before serving so they catch every bit of light. This final touch is what makes it feel truly festive.
 Pin It
 There's something about presenting this cake that makes people smile before they even taste it—the gold sprinkles catch the light, the marshmallow cheeks give it personality, and suddenly it's not just dessert anymore, it's an edible character worth celebrating. That moment when everyone around the table goes quiet because they're looking at it is when you know the effort was absolutely worth it.
Flavor Variations Worth Trying
The vanilla cake is classic and works beautifully as-is, but I've had great success swapping out half a cup of flour for unsweetened cocoa powder if you want a chocolate bunny instead. The chocolate version pairs wonderfully with the same white buttercream and coconut, creating a richer flavor that still feels festive with the gold sprinkles—it's subtle enough that kids still love it, but grown-ups will appreciate the depth. You could also try adding half a teaspoon of almond extract to the batter for a delicate flavor boost that makes people ask what the secret ingredient is.
Storage and Make-Ahead Tips
This cake genuinely improves if you bake the layers a day ahead and let them sit wrapped in plastic wrap—the crumb settles and becomes even more tender. The buttercream can be made up to three days in advance if you keep it covered in the fridge; just bring it back to room temperature and re-whip it gently before frosting. The fully decorated bunny stays fresh at room temperature for up to two days, but if you need it to last longer, refrigerate it and the coconut will stay crispy while the cake stays moist.
Decorating Ideas and Edible Gold Options
If you want to elevate the shimmer beyond standard gold sprinkles, edible gold leaf or edible gold dust creates a more luxurious effect that catches light differently and feels genuinely fancy. The gold dust is particularly forgiving because you can brush it on gently after everything else is arranged, so there's no risk of it falling off before serving. You can also layer different textures—some coconut, some gold sprinkles, maybe a delicate drizzle of white chocolate across the face—but the beauty of this cake is that the simple version is already stunning without overcomplicating it.
- Gold leaf looks more elegant than sprinkles but requires a gentle touch and a clean brush to apply without tearing.
- Edible pearl dust creates a softer shimmer than gold sprinkles if you want something less bold.
- Remember that any edible decoration should go on right before serving so it stays pristine and catches the light.
 Pin It
 Making this cake becomes less about following instructions and more about creating a moment—the kind where flour gets everywhere, kids laugh, and something genuinely beautiful ends up on the table. That's the real recipe here.
Recipe Questions & Answers
- → How do I achieve the bunny shape?
Use two 9-inch round cakes, cutting one into ears and a bowtie, and arrange on a platter with the other as the face.
- → What technique is best for fluffy buttercream?
Beat softened butter until creamy before gradually adding powdered sugar, milk, vanilla, and a pinch of salt until smooth and fluffy.
- → Can the coconut coloring be adjusted?
Yes, tint shredded coconut with pink gel food coloring to highlight inner ears and nose details.
- → What alternatives exist for decoration sparkle?
Edible gold leaf or gold dust can replace sprinkles for an elegant shimmer effect.
- → How should leftovers be stored?
Keep covered at room temperature up to 2 days or refrigerate up to 5 days to maintain freshness.