 Pin It
 My neighbor threw open her apartment doors on a Saturday afternoon, and suddenly there was this moment where everyone gravitated toward the dessert table like it was the most natural thing in the world. She'd arranged three different mini treats on a tiered stand, and I watched people load small plates, trying one of each, then coming back for seconds. That's when it clicked for me—a dessert bar isn't really about having the most impressive single cake; it's about giving people permission to taste their way through joy, tiny bite by tiny bite.
I remember standing in my kitchen at 10 pm the night before hosting, suddenly panicked that brownies and cheesecake and tartlets was somehow trying too hard. My partner wandered in, grabbed a brownie bite I'd made as a test, took one bite, then wordlessly pointed at the lemon cheesecake. The tartlet didn't need defending—it spoke for itself with those glossy berries catching the light. That's when the anxiety lifted; this wasn't about perfection, it was about abundance.
Ingredients
- Unsalted butter: Use quality butter here because it's one of your few base ingredients and it matters—the richness carries through to everything, from the brownie's fudgy texture to the tartlet's crisp shell.
- Dark chocolate, chopped: Go for something you actually enjoy eating on its own; cheap chocolate will make your brownies taste like cardboard with cocoa powder.
- Granulated sugar: Keep it standard granulated rather than experimenting with alternatives for your first attempt—it dissolves predictably and lets the other flavors shine.
- Large eggs: Room temperature eggs mix more smoothly and create a better emulsion in your batters and fillings.
- Vanilla extract: Real vanilla makes a noticeable difference in subtle ways you'll taste across all three treats.
- All-purpose flour: Sift it if you have a minute, but honestly, just whisk it into the dry ingredients before folding to avoid over-mixing your brownie batter.
- Cream cheese, softened: Take it out of the fridge at least an hour before mixing so it's genuinely soft and creamy, not cold and lumpy.
- Lemon juice and zest: Fresh lemon is the whole point of the cheesecake cups, so don't reach for that yellow bottle you've had since 2019.
- Digestive biscuits or graham crackers: Crush them finely by hand or in a food processor until they look like sand; larger chunks will make the crust gritty.
- Ready-rolled shortcrust pastry: This is your time-saving secret and nobody needs to know you didn't make it from scratch.
- Cornstarch: This is what transforms milk and egg yolk into proper pastry cream instead of scrambled eggs masquerading as filling.
- Fresh berries: Buy them the day before if you can, rinse them gently, and pat dry so they're not sitting in moisture.
Tired of Takeout? 🥡
Get 10 meals you can make faster than delivery arrives. Seriously.
One email. No spam. Unsubscribe anytime.
Instructions
- Set up your workspace:
- Preheat your oven to 180°C and line up all three tin types—mini muffin tins for the brownies and cheesecake, tartlet tins for the shells. Having everything ready means you're not hunting for equipment while chocolate is melting.
- Melt chocolate and butter together:
- Use a heatproof bowl over simmering water or microwave in 20-second bursts, stirring between each one so nothing seizes up and turns grainy. The moment it's smooth and glossy, pull it off heat.
- Mix your brownie batter:
- Whisk sugar, eggs, and vanilla into the melted chocolate, then fold in flour and salt gently—you're aiming for just combined, not beaten to death. Overmixing creates tough brownies instead of fudgy ones.
- Fill and bake brownie cups:
- Spoon batter into 8 cups and bake until the edges look set but the center still jiggles slightly when you nudge the tin. They'll firm up as they cool, and that's where the fudgy magic happens.
- Prepare your cheesecake crusts:
- Mix crushed biscuits with melted butter until it feels like wet sand, then press firmly into the bottom of 8 cups. A small measuring cup or shot glass works perfectly for pressing evenly.
- Blend cheesecake filling:
- Beat cream cheese and sugar until there are no lumps, then add egg, lemon juice, zest, and vanilla gently—mix just until combined to avoid incorporating excess air that could cause cracks. Pour over crusts and bake until the centers barely jiggle.
- Cool your cheesecakes:
- Let them rest in the tin first, then pop them in the fridge for at least two hours so they set properly and develop that creamy texture.
- Prepare tartlet shells:
- Cut pastry circles, press into tins, prick the bases so they don't puff up, and bake until golden brown. The pricking step is small but saves you from soggy bottoms.
- Make pastry cream:
- Whisk milk, egg yolk, sugar, cornstarch, and vanilla in a saucepan and heat gently while stirring constantly—you'll feel the moment it thickens and becomes proper cream instead of sweet milk. Let it cool slightly before filling so it doesn't melt your pastry shells.
- Assemble tartlets:
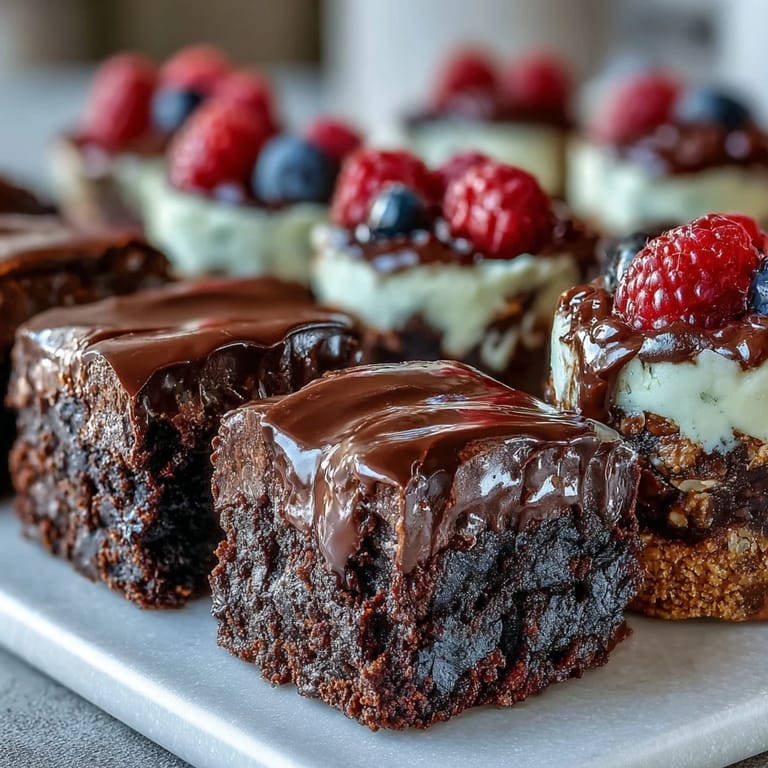
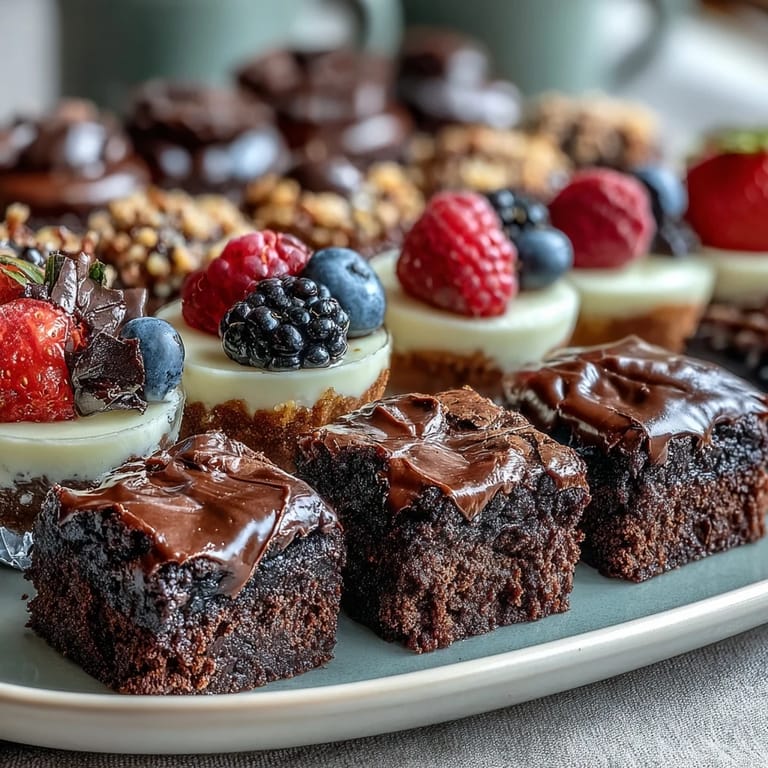
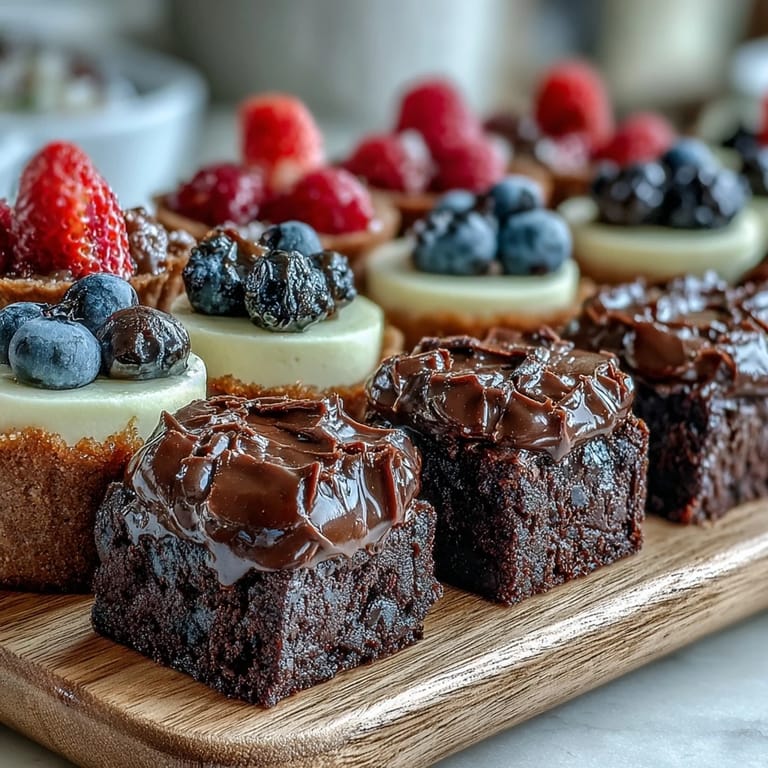
- Fill cooled shells with pastry cream, top with fresh berries, and arrange them on your platter last so the berries stay jewel-like and fresh-looking.
- Arrange your dessert bar:
- Pile everything on a tiered stand or platter so people can see all three options at once—the visual variety is half the appeal. Tuck mint leaves around the edges if you're feeling fancy.
 Pin It
 There's something genuinely moving about watching people slow down at a dessert bar, actually choosing instead of just taking the first thing. My friend Sarah stood there for what felt like ages, studying the arrangement like it was a museum display, before finally picking up a tartlet. She closed her eyes while she ate it, and that moment—that small, unhurried moment—felt like the whole point of hosting.
Timing Your Assembly
The beautiful thing about this dessert bar is that it doesn't require perfect synchronization if you plan ahead. Bake your brownies and cheesecakes the day before and store them separately in airtight containers—they actually improve with time as flavors settle. Make your pastry cream the morning of your gathering and fill the tartlet shells no more than two hours before serving, so the pastry stays crisp. This staggered approach means you're not frantic on party day, just calmly arranging beautiful things on a platter while your guests arrive.
Scaling Up or Down
This recipe makes exactly 24 mini treats, which serves eight to twelve people as a dessert course or larger group as passed bites. If you're hosting smaller, simply halve the recipe—make 4 brownies, 4 cheesecakes, and 4 tartlets instead. If you're feeding a crowd, double everything and use multiple tins; the baking times stay the same because you're still working with individually-sized portions. The math is forgiving, which is its own kind of gift when you're planning something that feels fancy but doesn't need to be complicated.
Flavor Variations That Actually Work
Once you've made these three treats once, you'll start seeing variations everywhere. Swap the lemon in cheesecakes for lime or orange zest, or skip citrus altogether and add a tablespoon of instant espresso powder to the filling for mocha cheesecake. The brownie bites can handle a tiny pinch of cayenne pepper or a tablespoon of instant coffee mixed into the dry ingredients. For tartlets, try seasonal fruit combinations—peaches and raspberries in summer, pomegranate seeds and cranberries in winter, or even candied citrus peel if you're feeling ambitious. The foundation stays the same; you're just ringing different bells with the same instrument.
- Lemon zest can be swapped for any citrus that appeals to you without changing cooking time or technique.
- A touch of espresso powder in the brownie batter adds depth without making them taste like coffee.
- Seasonal berries work beautifully; just make sure whatever you choose is ripe, dry, and arranged on the platter last.
 Pin It
 A dessert bar is permission to celebrate abundance without apology, to say yes to your guests' variety of cravings all at once. Make this for someone you're happy to see.
Recipe Questions & Answers
- → What oven temperature is best for baking the mini treats?
Preheat your oven to 180°C (350°F) for optimal baking of mini brownie bites, cheesecake cups, and fruit tartlets.
- → Can I use gluten-free flour for the brownie bites?
Yes, a gluten-free flour blend can substitute all-purpose flour to accommodate gluten sensitivities, though texture may vary slightly.
- → How should I store the assembled mini treats?
Keep the mini treats refrigerated in an airtight container to maintain freshness and prevent the cheesecake cups from softening.
- → Are there options to customize the fruit tartlets?
Absolutely—seasonal fresh berries or other fruits can be used to top the tartlets, allowing flexibility and freshness.
- → Is there a way to add extra flair to the dessert bar?
Consider drizzling melted chocolate or topping with whipped cream and fresh mint leaves to enhance presentation and flavor.